Mould rarely starts with a “big flood”. It starts with hidden water leaks and the kind of damp environments they create behind plasterboard, under floors, and inside cupboards where air barely moves. The frustrating part is that the first visible clue is often a black speckle on paint or a musty smell - long after the moisture has been there doing quiet damage.
Experienced plumbing engineers don’t begin by arguing about bleach versus anti-mould paint. They begin by asking one blunt question: where is the water coming from, and why is it staying here?
The mould tells you where, the plumbing tells you why
Mould is a symptom. Moisture is the cause. The job is to figure out whether you’re dealing with a one-off condensation issue or a continuous source of water that’s feeding the problem every day.
In practice, engineers look for patterns: where it’s growing, when it worsens, and whether it’s tied to a particular use of the house - showers, heating cycles, the washing machine, or a toilet flush you stopped noticing years ago.
A mould patch that “comes back” after cleaning is often telling you the moisture never left.
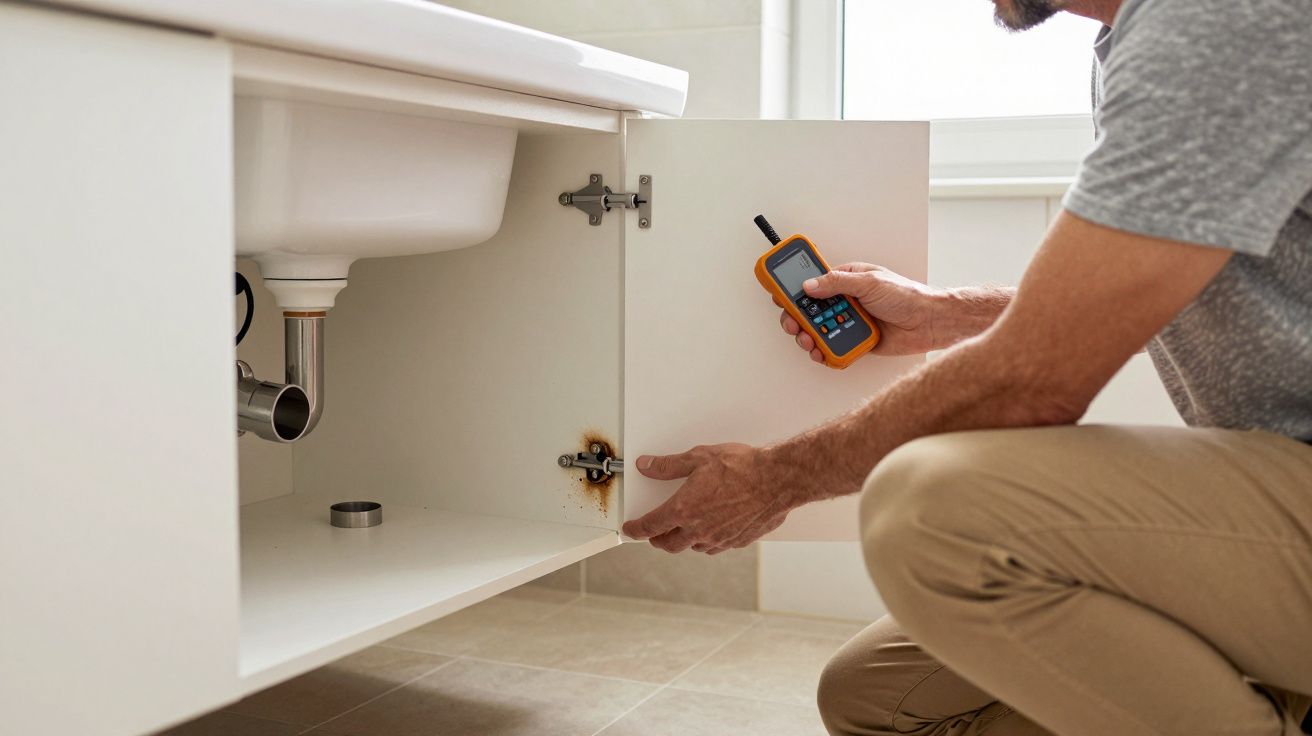
The first checks: simple, boring, and surprisingly revealing
Before anyone reaches for a fancy camera, a good engineer will do the unglamorous basics. These catch a lot of faults quickly, especially in older homes with layers of repairs.
Typical first checks include:
- Visual inspection of all “wet walls”: behind kitchens, bathrooms, utility rooms, and any wall shared with a neighbour’s bathroom.
- Touch-and-smell test around pipe runs: musty odours, soft skirting boards, blistering paint, salt marks.
- Moisture readings on plaster, timber, and floor edges to map the dampest area (not just the mouldiest).
- Pressure and flow sanity checks: unexplained pressure drops, pumps cycling oddly, or a combi boiler losing pressure.
This is the point where many homeowners get their first useful insight: mould often appears away from the leak, because water travels along joists, pipes, or the back of a wall.
Hidden water leaks engineers suspect first (because they see them weekly)
Some plumbing faults are repeat offenders. They’re common, they’re sneaky, and they create just enough moisture to keep materials damp without ever producing a dramatic puddle.
1) Weeping pipe joints and micro-leaks under floors
Copper joints, plastic push-fits, and old compression fittings can “weep” for months. The water evaporates into the void, feeds mould on timber, and leaves you with that stubborn smell that never quite clears.
Engineers will check beneath bathrooms and kitchens first, especially where pipes have been altered over time. The telltale signs are often indirect: darkened joists, rusty nail heads, or a patch of flooring that feels slightly springy.
2) Failed silicone and grout that lets water behind tiles
This one looks like “a bit of mould in the shower”. But if water is getting behind tiles, it can soak plasterboard or dot-and-dab walls and stay there for ages.
Engineers look for:
- Loose tiles or hollow-sounding areas
- Cracked grout lines at corners
- Swollen skirting boards outside the shower area
- A shower tray edge that’s moved away from the wall by a millimetre or two
That tiny gap is enough. Water doesn’t need an invitation; it needs time.
3) Leaking wastes, traps, and overflows (the slow-drip classics)
A waste pipe under a bath or basin can drip only when the tap runs. A trap can leak only when it’s bumped. An overflow can seep because the washer has perished.
These faults are popular because they hide in cupboards and boxed-in voids. They also create mould in places people don’t clean often - the back corners of vanity units, the underside of shelves, the rear of skirting boards.
4) Toilet leaks that never make a puddle
Toilets can leak from the pan connector, the cistern bolts, the fill valve, or a hairline crack in the ceramic. The water can run under vinyl, into grout lines, or along the subfloor and show up as mould on a nearby wall.
Engineers often dye-test a cistern and check for movement in the pan. A toilet that rocks slightly is a red flag: movement breaks seals, seals leak, and the leak keeps the area damp even if you mop the surface.
5) Radiator valves and heating pipework in stud walls
In winter, mould problems often get blamed on “condensation”. Sometimes it is. Sometimes it’s a tiny leak on a heating pipe that only seeps when the system is hot and pressurised.
Engineers will check:
- Radiator valve glands for staining
- Pipework boxing for damp at the bottom edge
- Boiler pressure history (repeated top-ups aren’t normal)
A heating leak also warms the damp area slightly, which can make mould grow faster while keeping the surface deceptively dry.
Why damp environments form even without a dramatic leak
Not every mould case is a plumbing failure, but plumbing often creates the conditions that make ordinary moisture become a long-term problem.
Two things matter as much as the leak itself:
- Where the water goes (into an unventilated void, onto absorbent materials, under impermeable flooring)
- How easily it can dry (airflow, heat, vapour barriers, insulation cold spots)
That’s why engineers pay attention to boxing-in, insulation, and ventilation around pipe runs. A perfectly “small” leak in the wrong place can create a perfectly persistent mould problem.
What a good engineer will do next (once suspicion is high)
If the first checks point to plumbing, the next steps are about confirmation without unnecessary damage. The best approach is methodical: prove the source, then open up only what you must.
Common next moves include:
- Isolating fixtures (turning off appliances, capping feeds, testing one area at a time)
- Targeted access (lifting one floorboard, opening one inspection hatch, removing one bath panel)
- Thermal imaging and acoustic listening (useful, but only when used with context)
- Pressure testing for hidden supply leaks, and dye or flow tests for wastes
If you’re being offered “rip out the bathroom and see”, pause. Sometimes that’s necessary - but it shouldn’t be the opening move.
The quick triage: clues that point to plumbing, not just condensation
Condensation mould tends to show up on cold surfaces with poor airflow: window reveals, external corners, behind wardrobes. Plumbing-linked mould often has a more “local” story.
A rough guide engineers use:
- Mould in a straight line low on a wall: think pipe run or skirting-level damp migration.
- One stubborn patch in a ceiling below a bathroom: think shower waste, bath waste, or supply joints.
- Musty smell in a kitchen unit: think sink waste, dishwasher feed, or a pinhole in a pipe.
- Flooring edges curling near a toilet or basin: think slow leak under vinyl/laminate.
None of these prove it alone. But they tell you where to look first, which is half the battle.
Fixing mould properly means fixing moisture and the materials it reached
Stopping the leak is step one. Step two is dealing with what stayed wet long enough to grow mould: timber, plasterboard, insulation, underlay, and the little pockets of stagnant air where spores thrive.
Engineers will often recommend (or coordinate with) drying and remediation work, because repainting over a damp substrate is a short, expensive loop. The real win is getting the structure dry enough that mould can’t “reboot” the moment the room cools down again.
FAQ:
- What’s the most common plumbing fault behind recurring mould? Slow leaks on wastes and traps, followed closely by failed shower seals letting water behind tiles. They’re common because they only leak during use and stay hidden.
- Can mould appear far from the leak? Yes. Water can travel along joists, pipe runs, and the back of plasterboard, so the visible mould is sometimes just the first place moisture finds a cold surface.
- If my boiler pressure keeps dropping, is mould a possibility? Potentially. Repeated top-ups can indicate a heating leak, and a small seep inside a wall or floor void can create persistent damp even without visible staining.
- Do I need thermal imaging to find hidden water leaks? Not always. Good engineers start with moisture mapping, access checks, and fixture isolation. Thermal imaging helps when used to confirm a suspected area, not as a fishing expedition.
- Should I clean the mould before the leak is fixed? You can reduce surface spores for hygiene, but it often returns if moisture persists. Prioritise finding and stopping the water source, then dry and remediate properly.


Comments (0)
No comments yet. Be the first to comment!
Leave a Comment